
DDEP Web Application
Instructions for the DDEP Web Application
Or click on the headings below to open a topic individually.
Establish Security Access [+]
Ensure you have proper security access for the Direct Deposits – Reversals and Reclamations (DDEP) web application. Contact your agency security coordinator (Comptroller user ID required) to request DDEP web application access for each agency number you are reporting.
When an agency is unable to access DDEP, it must submit the following forms and explain why it is unable to access DDEP:
Log Into the DDEP Web Application [+]
Once security access is established, you can access the Direct Deposits – Reversals and Reclamations (DDEP) web application.
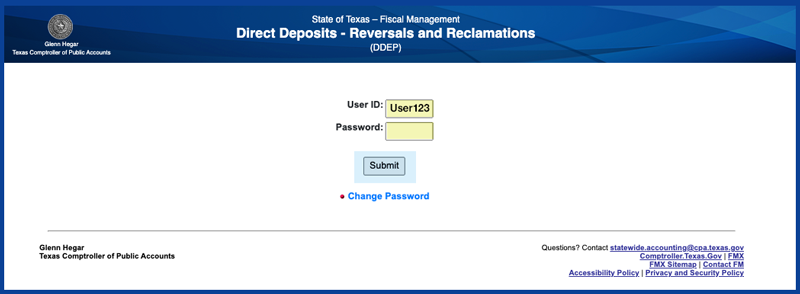
- Enter your user ID in the
USER IDfield. Your user ID is the same as the ACID you use to access the Comptroller’s mainframe. -
Enter your password (your TINS and USAS password). DDEP has the same three login attempts as TINS and USAS.
An invalid user ID or password, or an invalid combination of both fields displays the error message Invalid User ID and/or Password.
-
Select Submit.
After three failed attempts, contact the Comptroller’s help desk to reset your password: (512) 463-HELP (4357) or help.desk@cpa.texas.gov.
DDEP times out after one hour of no activity. If a DDEP screen is displayed and a user attempts to add or change transactions after one hour of no activity, DDEP returns to the login page.
Add a Reversal/Reclamation [+]
DDEP includes edits for the reversal and reclamation deadlines set by the National Automated Clearing House Association (NACHA) and requires users to select values for specific fields such as the reason for a reversal.
-
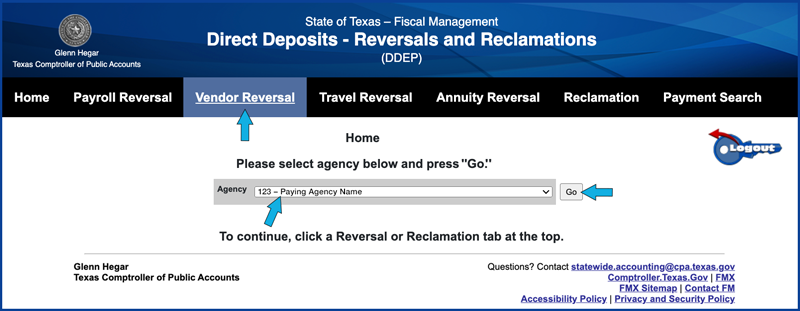
Users with security access to only one agency: Select an action tab in the top menu bar.
Users with security access to multiple agencies: Select an agency from the agency drop-down list, select Go, then select an action tab in the top menu bar.
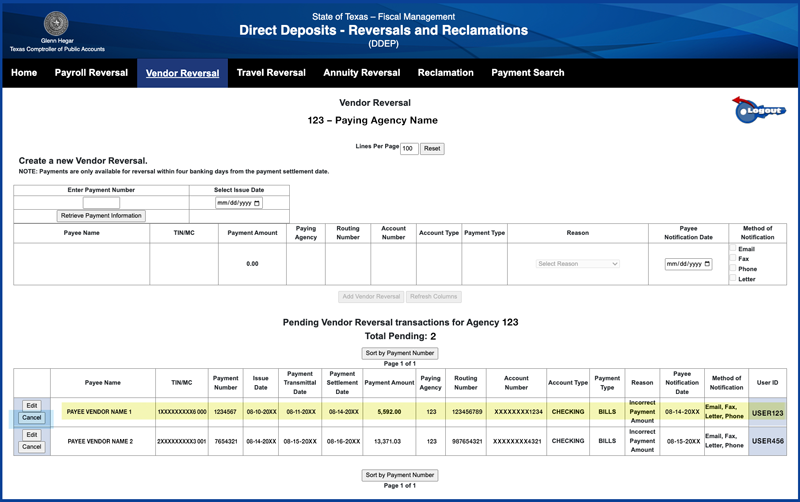
For these instructions, Vendor Reversal is selected.
Screen examples display all the available tabs for demonstration purposes. Tabs the user does not have security for will not display.

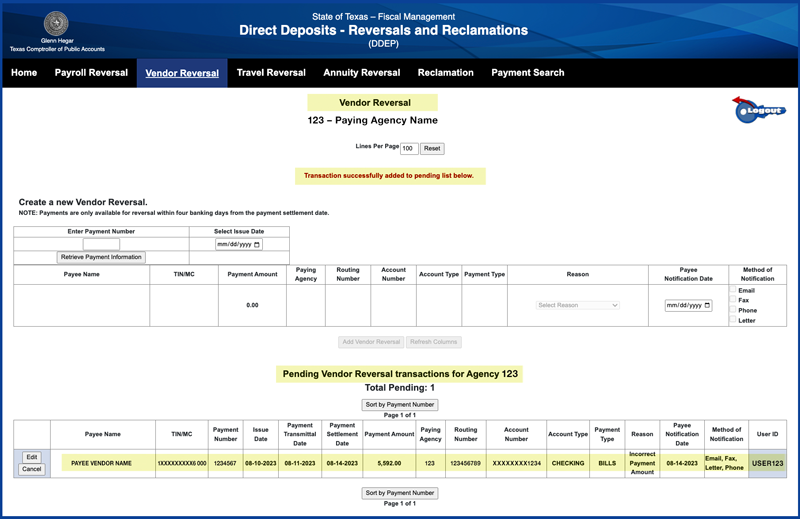
Once a tab is selected, DDEP displays the page title for the reversal type selected and the default or selected agency.
Two messages display on the left of the screen:
- Create a new Vendor Reversal.
- NOTE: Payments are only available for reversal within four banking days from payment settlement date.
ENTER PAYMENT NUMBER: Enter the seven-digit payment number. If a user enters fewer than seven digits, DDEP displays the message Payment Number must be 7 digits, including any preceding zeros.SELECT ISSUE DATE: Defaults to current date. Change the date or select the calendar icon to choose the payment issue date.-
Select Retrieve Payment Information.
If … Then … The payment issue date is more than four banking days before current date The payment is not eligible for a reversal.
DDEP displays the message Payment no longer available for reversal.
The issue date is not the correct date for the payment number DDEP displays the message Payment not found for Issue Date. The payment issue date is within four banking days from current date and corresponds to the payment number DDEP retrieves and displays the payment details. 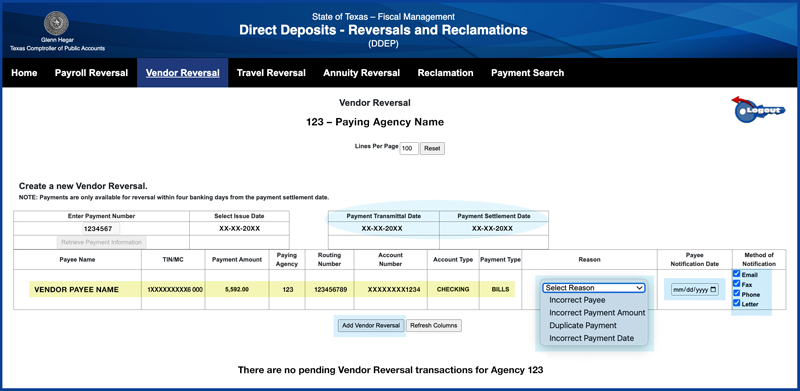
-
Verify the payment details correspond to the payment to be reversed.
If the payment details do not correspond to the payment to be reversed, select Refresh Columns to clear the entry fields and enter the correct payment number.
REASON: Select the drop-down arrow to display the list of reasons for the reversal. Select the appropriate reason. If the field is left blank, DDEP displays the message Must select a Reason.-
PAYEE NOTIFICATION DATE: Enter or select the calendar icon to choose the date you notified the payee that the payment would be reversed. Ensure the payment number, payment amount and payment date are included in your notification to the payee. See Payee Notification. DDEP edits this field to ensure compliance with the NACHA rules. The following messages display:If … Then … The field is left blank DDEP displays the message Must enter a valid Payee Notification Date. An invalid date is entered that does not meet the NACHA requirement DDEP displays the message Payee Notification Date may not be before Payment Transmittal Date or later than Reversal Settlement Date.
The reversal settlement date is two banking days after the date the reversal is processed in DDEP.
METHOD OF NOTIFICATION: Select the check box with the method(s) used to provide the reversal notification to the payee. Multiple boxes may be selected. If the field is blank, DDEP displays the message Must select at least one Method of Notification.-
Select Add Vendor Reversal to add the transaction to DDEP.
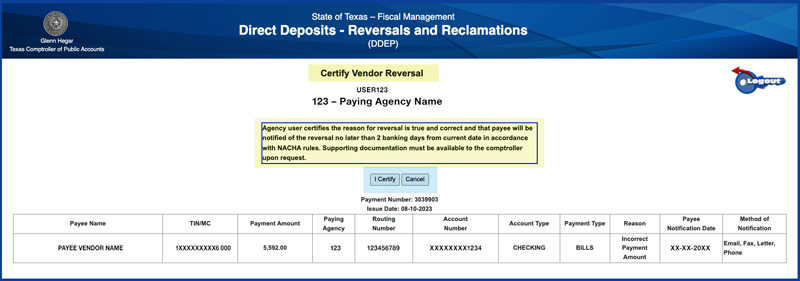
The Certify Vendor Reversal screen displays with:
- User ID.
- Paying agency number and name.
- A certification statement that the reversal reason and dates are correct.
- Two buttons:
- I Certify.
- Cancel.
- Payment number.
- Issue date.
- Payment details with values entered or selected for:
- Reason.
- Payee notification date.
- Method of notification.
- Select I Certify if the payment details correspond to the payment to be reversed and the fields entered are correct. DDEP displays the Vendor Reversal screen with the message Transaction successfully added to pending list below. Go to Step 11.
– or –Select Cancel if the fields entered are not correct. DDEP returns to the Vendor Reversal screen where the entry fields can be edited.
- Update any incorrect entry fields, then select Add Vendor Reversal to return to the certification screen.
– or – -
Select Refresh Columns to abort the transaction. DDEP clears all fields and is ready for a new payment number to be entered. Return to Step 2.
- Update any incorrect entry fields, then select Add Vendor Reversal to return to the certification screen.
-
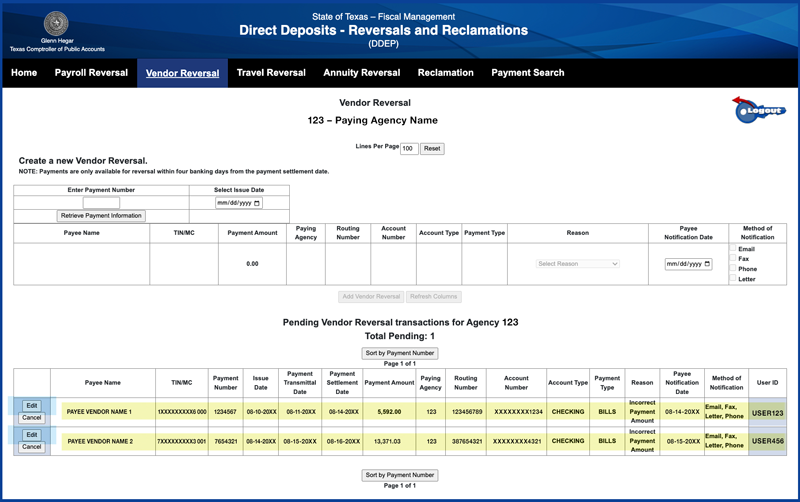
Scroll down the Vendor Reversal screen to Pending Vendor Reversal Transactions for Agency 123.
A row displays for each reversal transaction that is added. This list can be used as a tool for quality control checks to:
- Verify the reversals that need to be transmitted to the ACH network are in the list.
- Reverify the fields entered are correct.
- Check the last
USER IDfield for the user who certified the reversal.
Edit: The edit button on each transaction row allows you to make changes to the reversal transaction. See Edit a Reversal/Reclamation for step-by-step instructions.
Cancel: The cancel button on each transaction row allows you to cancel the reversal transaction so it is not transmitted through the ACH network. See Cancel a Reversal/Reclamation for instructions.
- Sort the pending list: The reversals listed in the pending list can be sorted by payment number or payee name. The default is payment number.
- Select Sort by Payment Number. The button changes to Sort by Name and the list sorts the transactions by payee name.
- Select Sort by Name to change the sort back to payment number.
Edit a Reversal/Reclamation [+]
Once a reversal or reclamation transaction has been added to the Direct Deposits – Reversals and Reclamations (DDEP) web application via Add a Reversal/Reclamation, the transaction can be edited by changing the fields entered.
Transactions in the DDEP pending list can be edited, and generally can only be edited the same day they are added in DDEP. Once the nightly processing cycle begins, transactions can no longer be edited, and will be transmitted to the automated clearing house (ACH) network the next business day.
Certain transactions, such as reversals for post-dated payrolls and annuities, can remain pending more than one day and can be edited while displayed on the pending list.
A transaction can be edited by a different user than the one who added the transaction if both users have the same security access to add reversals or reclamations. DDEP stores the user ID of the user who adds, edits or cancels a transaction and maintains it in history.
- From the home page, select one of the action tabs in the top menu bar. For these instructions, Vendor Reversal is selected.
- Scroll to the pending list.
-
Select Edit on the row for the transaction to be edited.
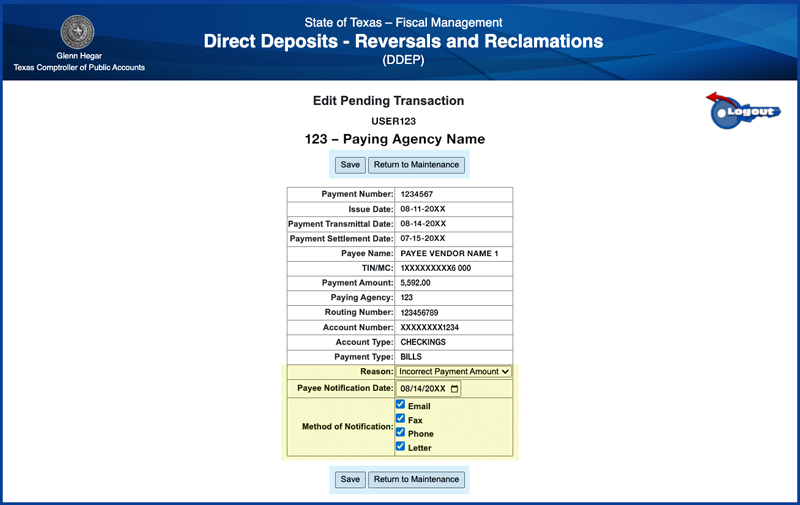
The Edit Pending Transaction screen displays a table with payment details and fields entered, and has two buttons both above and below the table:
- Save
- Return to Maintenance
The only fields that can be edited are:
REASONPAYEE NOTIFICATION DATEMETHOD OF NOTIFICATION
If you change any of these three fields, select Save, then go to Step 5.
If you select Save without making changes, DDEP displays the message: At least one field must change, or select Return to Maintenance.
-
Select Return to Maintenance to abort the edit function and return to the pending list.

The Certify Vendor Reversal screen displays.
-
Select I Certify if the field(s) changed are correct. DDEP displays the Vendor Reversal screen with the message Transaction successfully updated.
– or –
Select Cancel to abort the edit function and return to the pending list.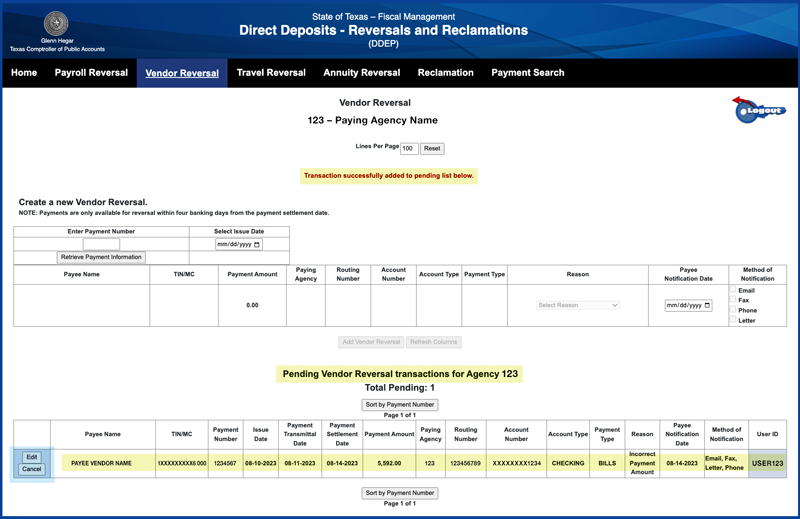
- Verify your changes were updated in the pending list. If the update was made in error, select Edit again and repeat Steps 4-6.
Cancel a Reversal/Reclamation [+]
A reversal or reclamation transaction that was added to the Direct Deposits – Reversals and Reclamations (DDEP) web application via Add a Reversal/Reclamation can be canceled to prevent it from being sent to the automated clearing house (ACH) network. Once the nightly processing cycle begins, transactions can no longer be canceled and will be transmitted the next business day.
Certain transactions, such as reversals for post-dated payrolls and annuities, can remain pending more than one day and can be canceled while displayed on the pending list.
A transaction can be canceled by a different user than the one who added the transaction if both users have the same security access to add reversals or reclamations. DDEP stores the user ID of the user who adds, edits or cancels a transaction and maintains it in history.
- From the home page, select one of the action tabs in the top menu bar. For these instructions, Vendor Reversal is selected.
- Scroll to the pending list.
-
Select Cancel on the row for the transaction to be canceled.
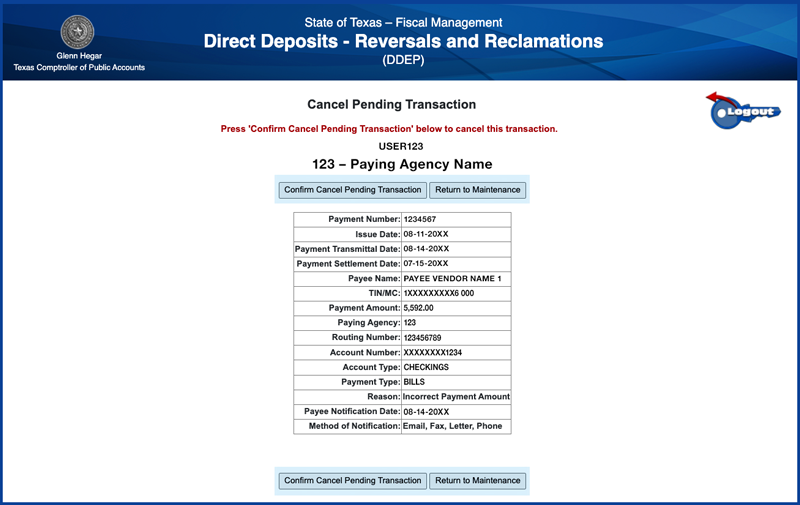
The Cancel Pending Transaction screen displays a table with payment details and fields entered, and has two buttons both above and below the table:
- Confirm Cancel Pending Transaction
- Return to Maintenance
- Select Confirm Cancel Pending Transaction to cancel the transaction so it is not transmitted to the ACH network. The Vendor Reversal screen displays the message Pending transaction successfully canceled.
– or –Select Return to Maintenance to abort the cancel function and return to the pending list. Verify your transaction remains in the pending list.
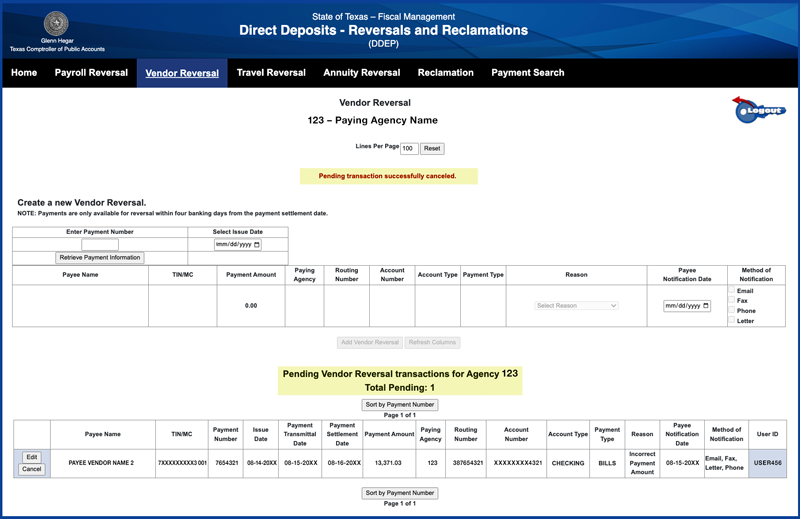
- Verify your transaction was deleted from the pending list. If it was deleted in error, the transaction must be readded. See Add a Reversal/Reclamation.
Payment Search [+]
Use the Payment Search tab on the Direct Deposits – Reversals and Reclamations (DDEP) web application to search for:
-
Direct deposit payments issued within the eight most recent fiscal years for state employee payroll, travel payments, and payments to retirees, vendors and individual payees.
The type of payments a user can search is based on the type of payment(s) the user can process reversals or reclamations for. For example, a user with security to process only vendor reversals will only be able to search vendor payments.
Exception: Payments to payroll deduction payees are not searchable in DDEP. See Payroll Deduction Payments.
- The status of a reversal or reclamation, whether funds were successfully retrieved or the transaction was rejected by the payee’s financial institution.
- Whether the direct deposit payment resulted in a returned money item initiated by the payee’s financial institution and the reason for the return.
-
Log in, then select the Payment Search tab.
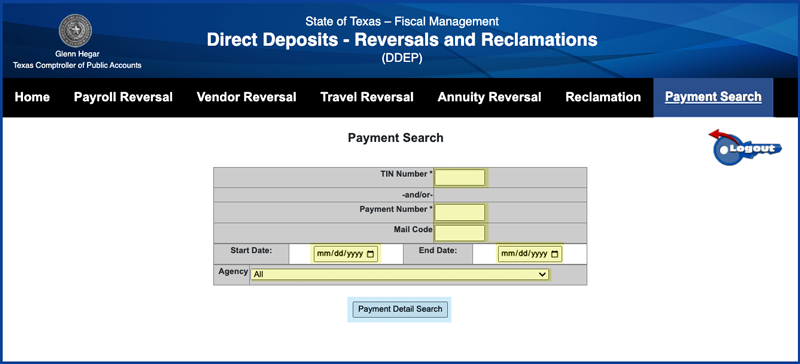
The Payment Search screen displays the available entry fields.
-
TIN NUMBER: Enter the 11-digit Texas Identification Number (TIN). If the TIN is less than 11 digits, DDEP displays the message TIN Number must be 11 digits.– and/or –
PAYMENT NUMBER: Enter the seven-digit direct deposit payment number to be searched. If there are fewer than seven digits, DDEP displays the message Payment Number must be 7 digits, including any preceding zeros.Note: DDEP requires either the TIN or payment number and allows both to be entered.
MAIL CODE: Enter the three-digit mail code as an optional field when searching for payments issued to a specific mail code. If the mail code entered has fewer than three characters, DDEP displays the message Mail Code must be 3 characters.START DATE: Enter or select the calendar icon to choose a date on or before the payment issue date. If the start date is a future date, DDEP displays the message Start Date cannot be greater than the End Date.END DATE: Defaults to the current date. Enter or select the calendar icon to choose a date that encompasses the payment issue date.AGENCY: Defaults to the user’s agency, or enter the agency number of the agency that issued the payment(s) to be searched.-
Select Payment Detail Search. If the values entered in any field do not match the payment record, DDEP displays the message No data found for the given parameters.
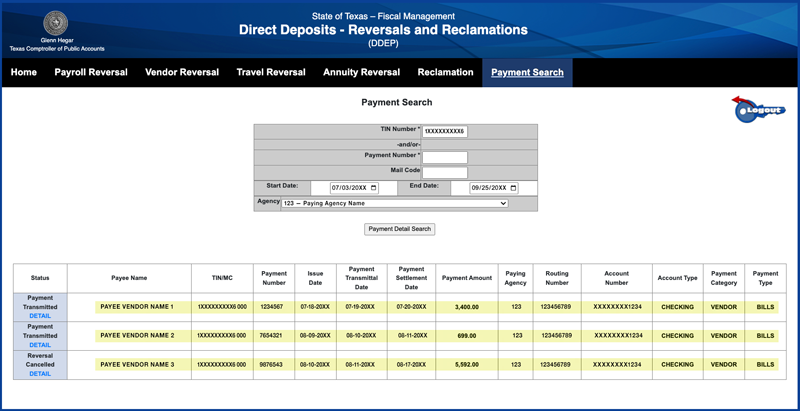
The Payment Search displays the results of the search. The Status column (column 1) includes a DETAIL link to each payment’s Payment Detail (history) screen.
-
Select DETAIL for the payment number to be searched to see that payment’s detailed history.
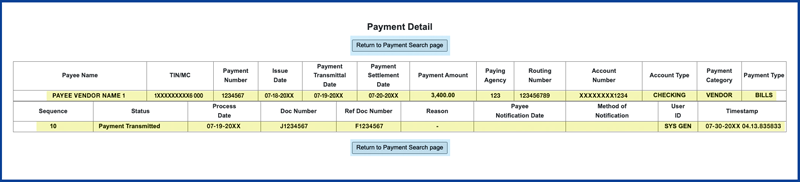
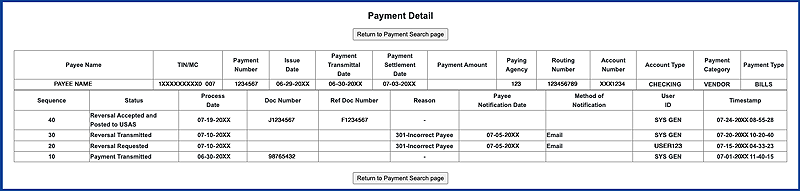
The Payment Detail screen displays the history details for the selected payment.
A transaction history row displays for each activity. The initial transaction activity for every direct deposit payment is Payment Transmitted, shown above in the Status column.
Examples of payment detail screens include:
Successful Reversal
Rejected Reversal

Returned Money Item
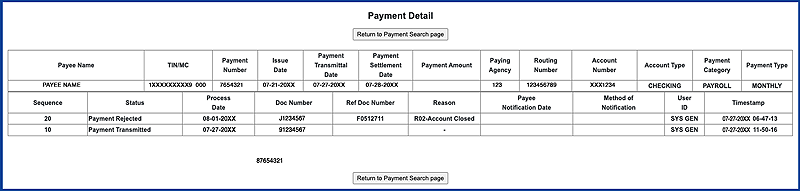
- Select Return to Payment Search page to search for another payment.
If DDEP is not responding, contact the Comptroller’s help desk at (512) 463-HELP (4357) or email help.desk@cpa.texas.gov. The email should reference the TINS DDEP web application.