
Reporting Requirements for Annual Financial Reports of State Agencies and Universities
Pass-Through Activity
Instructions for the SPTR Web Application
The State Pass-Through Records (SPTR) web application provides a user-friendly and intuitive method to electronically submit interagency state pass-through records, including accruals.
Or click on the headings below to open a topic individually.
Establish Security Access [+]
Ensure proper security access exists as early in the process as possible. Contact your agency’s security coordinator to request SPTR web application access for each agency number you are reporting.
Note: When requesting access from your security coordinator, ensure that you communicate the four-character Security Coordinator’s USAS Reference Code specific to this web application.
Log into the SPTR Web Application [+]
Once proper security access is established, you can access the SPTR web application.
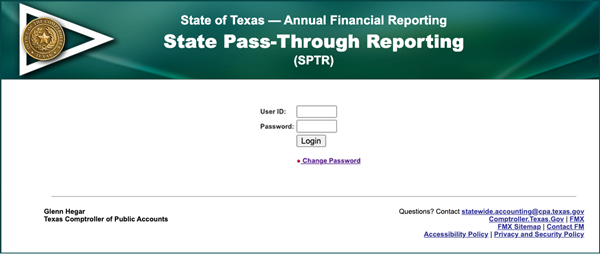
- Enter your
User ID.
Your User ID is the same as your ACID used to access the Comptroller’s mainframe and USAS. - Enter your
Password.
This is your USAS password. - Click Log in to enter the SPTR web application.
If your SPTR web application security access is denied and an error message displays, contact your agency’s security coordinator.
Home Screen [+]
Once logged on, the SPTR Home screen automatically appears.
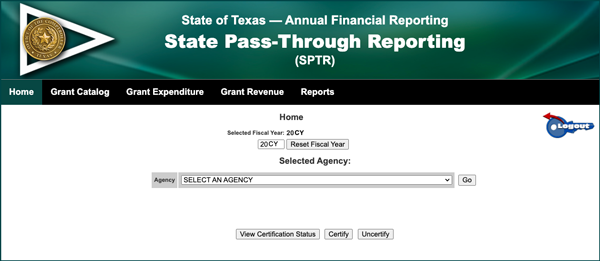
Select your agency from the drop-down menu. Users may choose from the following types of SPTR entries:
Data Entry
Agencies enter state pass-through expenditures, after which they accept or reject state pass-through revenues. The Batch Entry option allows the input of numerous grants at one time by submitting a specially formatted Excel spreadsheet.
Reports
The Grant Reconciliation Report is based entirely on the data entered in the SPTR web application by both the grantor (agency sending the money) and the grantee (agency receiving the money). The USAS Reconciliation Report is based entirely on data in USAS for both the grantor and the grantee. The total revenue and total expenditure amounts must reconcile between the Grant Reconciliation Report and the USAS Reconciliation Report to successfully certify.
Certification
On or before Sept. 28, 20CY, each agency must complete the SPTR Certification to certify that the agency has fully reconciled all interagency state pass-throughs to other agencies and to USAS.
Note: Interfund/interagency transactions must be entered in USAS by Sept. 26, 20CY.
Entering State Pass-Through Revenues and Expenditures [+]
Revenue
To enter and verify state pass-through revenues:
- Select the Grant Revenue tab.
The Maintain Grant Revenue screen displays.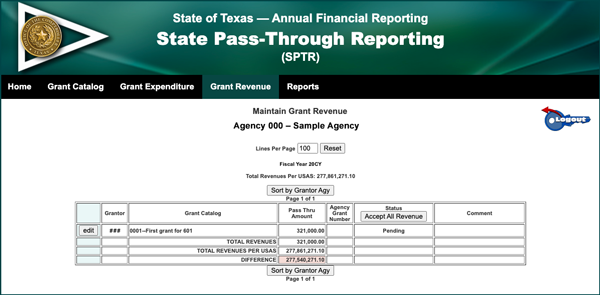
- After the grantor agency enters its grant expenditures in SPTR, the grantee agency must either:
- Click Accept All Revenue if the grantee is in agreement with all amounts entered by its grantor agency in the Pass-Through Amount column.
–OR– - Click edit on an individual line item, then choose Accepted from the Status dropdown menu if the grantee is in agreement with the pass-through amount entered by the grantor agency for that single line item.
–OR– - Select edit on an individual line item, then select Rejected from the status drop-down menu if the grantee is not in agreement with the pass-through amount entered by the grantor. If rejected, the grantee agency must enter a brief description providing a reason for the rejection.
Note: If any pass-through amounts were rejected, the grantee agency must communicate with the grantor agency in order to resolve all discrepancies.
- Click Accept All Revenue if the grantee is in agreement with all amounts entered by its grantor agency in the Pass-Through Amount column.
- Verify that the Total Revenues per USAS line item (located at the bottom of the data entry screen) matches the Total Revenues amount and that the Difference line item equals zero.
Note: If these totals do not match, the grantee agency must research the cause and coordinate with the grantor agency to make the necessary adjustments.
Grant Catalog and Grant ID
When editing a grant, select the Grant Catalog tab to choose a grant from the grant catalog list.
The grant catalog list is ordered by Grant ID. The Grant ID is a required element for each pass-through record entered in SPTR.
The Grant ID consists of seven digits. The seven digits are separated by a period between the third and fourth digits and correspond as follows:
- The first three digits represent the grantor agency.
- The last four digits are assigned to a specific grant automatically by the SPTR web application.
Example:
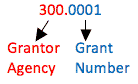
SPTR also displays the name of the grant next to the Grant ID.
Expenditures
To enter expenditures:
- Select the Grant Expenditure tab.
The Maintain Grant Expenditure screen displays.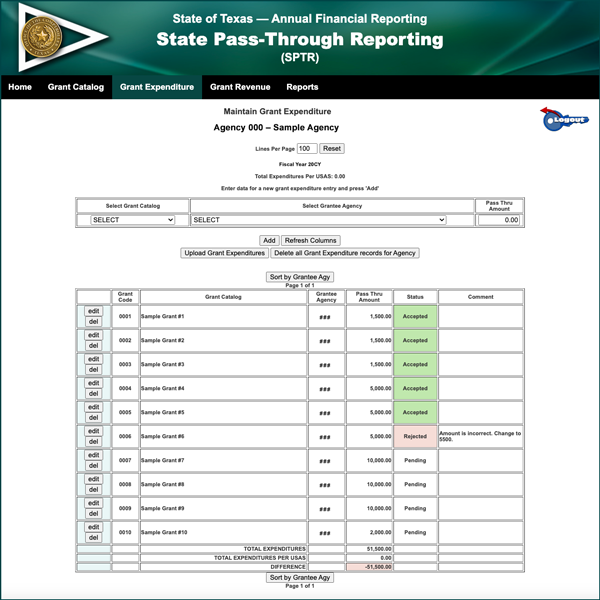
- Select the State Pass-Through Grant ID from the Grant Catalog drop-down menu of all grants available in SPTR.
Note: If you do not see the required grant in the drop-down menu, follow the instructions in Adding or Deleting a Grant to add an active state grant in SPTR.
- Enter the receiving agency number in the
GRANTEE AGENCYfield. - Enter the amount (the total by grant) of the grant received in the
PASS-THROUGH AMOUNTfield. - Verify that the Total Expenditures line item (located at the bottom of the data entry screen) matches the Total Expenditures per USAS and that the Difference line item equals zero.
Note: If these totals do not match, your agency needs to research the cause and make the necessary adjustments.
Batch Entry Instructions
Agencies may want to use the batch entry process in order to add multiple grants to either the grant catalog or to the expenditure list — rather than entering one record at a time.
Before making batch entries in SPTR, agencies must first create an Excel spreadsheet (file) to upload.
Note: Row 1 of the Excel file must be formatted as a “header row” with four specific columns:
- FY column
- Grantor Agy column
- Grant Code column
- Grant Description column
To make batch entries:
- Select the Grant Catalog tab.
The Main Grant Catalog screen displays.
- Click Upload Grant Catalog.
- Click Choose File.
- Route to the .xlsx file for upload.
- Click Upload Selected File.
Note: To make batch entries for grant expenditures, select the Grant Expenditures tab and follow the same process as above.
Adding or Deleting a Grant [+]
Note: To ensure the efficiency of the SPTR web application, it is important to only include current grants in the database.
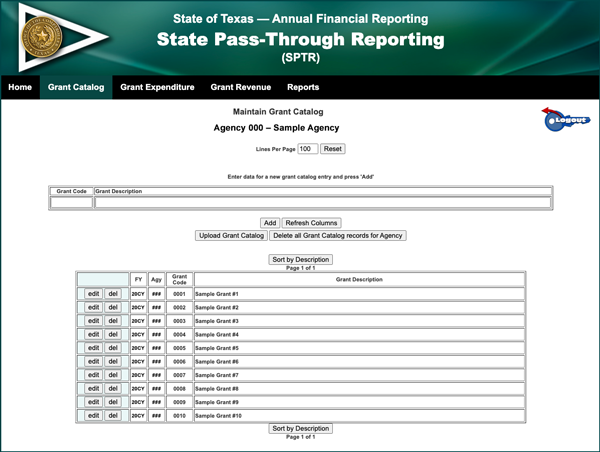
Adding a Grant
If expenditure grants do not exist for your agency, none have yet been defined in the grant catalog.
To add an active state grant, the grantor agency must:
- Select the Grant Catalog tab.
- Enter the
GRANT CODEandGRANT DESCRIPTIONfields. - Click the Add button.
Deleting a Grant
To delete a grant, the grantor agency must:
- Select the Grant Catalog tab.
- Click the del button on the row of the grant to be deleted.
To ensure efficiency and accuracy, it is important that SPTR only includes the current grants in its database.
Reports [+]
Grant Reconciliation Report
To view the Grant Reconciliation Report:
- Select the Reports tab.
- Select the Grant Reconciliation Report button.
The Grant Reconciliation Report displays the grant-level detail information.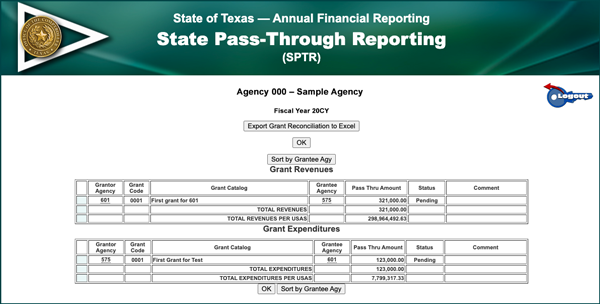
The Grant Reconciliation Report is compiled entirely from the data entered into the SPTR web application. If the grantor agency did not enter data in SPTR, the report does not display any records.
The Grant Reconciliation Report pulls all agency-related grants.
The goal of this report is for the grantor and grantee agencies to be in agreement on pass-through amounts for each line item. Once the grantor and grantee agencies are in agreement on all pass-through amounts, the Status column reflects that all line items were accepted.
The Total Revenues/Expenditures line item represents the total amount of revenues reported in the SPTR web application.
The Total Revenues/Expenditures Per USAS line item represents the total amount of state pass-through revenue recorded in USAS.
Once all grant expenditures are entered in SPTR and the grantee agency has accepted all pass-through amounts, the Total Revenues/Expenditures line item should match the amount of the Total Revenues/Expenditures Per USAS line item.
Important: To certify, all differences between the grantor, grantee and USAS must equal zero.
USAS Reconciliation Report
To view the USAS Reconciliation Report:
- Select the Reports tab.
- Select USAS Reconciliation Report button.
The USAS Reconciliation Report screen displays the USAS summary information.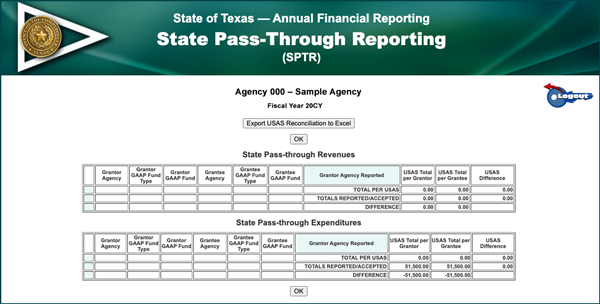
The USAS Reconciliation Report is compiled entirely from USAS data.
The underlying query behind the report is similar to the Interagency/Interfund Activity report in FMQuery–SIRS. The query extracts the data from USAS using the AGL. It is important for all entries in USAS related to state pass-through to contain AGLs. To assist agencies in tracing and reconciling the listed amount(s), the USAS Reconciliation Report provides information in columns for both the Grantor and Grantee GAAP fund types and GAAP funds for each listed line item.
Important: If there are no posts (NPs), the USAS Reconciliation Report will not load. The NPs will need to be corrected before the report can load.
The USAS Reconciliation Report extracts the grantor and grantee information from both USAS and the data entered in SPTR.
Note: This report is not reported at the grant level, but at the agency level.
The Total per USAS line item represents the total revenues/expenditures in USAS.
The Totals Reported/Accepted line item represents the total revenue/expenditure reported by the grantor and the grantee in the SPTR web application.
The goal of this report is to have the USAS Total per Grantor equal the USAS Total per Grantee for each listed agency, with the resulting amounts in the Difference column all zeros.
Once all state pass-throughs are accounted for in USAS and in SPTR, the Difference line item should be zero.
Important: All differences between the grantor, grantee and USAS must be zero to certify. Additionally, pass-throughs between funds outside of the state treasury must be entered in USAS in order to certify.
Component universities are no longer required to enter USAS entries for state grant interagency pass-throughs made between component universities within the university system. However, component universities are still required to report the state grant interagency pass-throughs within the university system in the SPTR web application.
This discrepancy will cause a legitimate exception in the reconciliation certification. Therefore, the final certification must be completed by the Comptroller’s Financial Reporting section. Request the final certification from your financial reporting analyst.
Final Certification [+]
The SPTR certification deadline is Sept. 28, 20CY. To certify, agencies must fully reconcile all interagency state pass-throughs and enter all interagency transactions in USAS. The SPTR portion of the reconciliation requires that:
- The Grant Reconciliation Report displays a difference of zero between Amounts Reported by Grantor and Amounts Reported by Grantee. The report must also display a difference of zero between Totals (total amounts reported) and Totals per USAS.
- The USAS Reconciliation Report displays a difference of zero between USAS Totals per Grantor and USAS Totals per Grantee. The report must also display a difference of zero between Totals per USAS and Totals per Grant-level Reporting.
If there are differences, the agency cannot certify. To certify:
- From the Home tab, click Certify.
The system automatically links to the agency’s Certification screen. - Review the certification statement.
- Enter the
NAME,TITLEandTELEPHONE NUMBERfor the individual responsible for SPTR. - Click Confirm Certification.
The screen displays the agency’s status as Completed and includes date, the agency’s contact information and any comments that were added.