USPS Process Guide –
Introduction –
Moving Around in USPS
Navigation
Use the following keys to navigate through USPS.
| Arrow Keys | Press one of the four arrow keys to move from character to character. |
|---|---|
| Tab Key | Press the Tab key to move from field to field. |
| Shift + Tab | Press the Shift and Tab keys together to move backwards from field to field. |
| Home Key | Press the Home key to return the cursor to the COMMAND field in the top left corner of the screen. |
Program Function Keys (PF Keys)
Personal computers have programmed keys that perform frequently used functions. The following chart identifies the USPS program function keys (PF Keys) used with an IBM-format keyboard.
| IBM PF Keys | Function | How to Use |
|---|---|---|
| F1 | System Help | Press F1 at any field to access the original system help. |
| F2 | USPS HELP | Press F2 to access USPS help. Press F2 a second time to access decode tables (if applicable). See Decode Table. |
| F3 | Cancel | Press F3 to cancel the current screen or return to the previous screen. |
| F4 | Link Down | Press F4 to link to another screen without losing the current screen. Note: If you establish more than three or four links you may receive an error message that reads excess storage requirement. In such cases, clear the screen using the Q command and access the screen directly. |
| F7 | Screen Forward | Use this key in conjunction with the F9 key to move from screen to screen in a series of linked screens. |
| F9 | Screen Back | Use this key in conjunction with the F7 key to link back and forth between linked screens. |
| F12 | Browse Back | Use this screen to browse backward through a multi-screen list. |
Using the Menu System for Navigation
Introduction
For new users, the menu system may be the easiest way to begin navigating the system. After logging into USPS, you will see the USPS main menu screen (CMONU). From the CMONU screen, you can select which module you would like to use in USPS.
> C     USPS,USPS SECURITY                                            ON CMONU

                  UNIFORM STATEWIDE PAYROLL/PERSONNEL SYSTEM

                        ** ENTER “XX” TO VIEW MENU **

                   ---TASK ID---       -----DESCRIPTION----

              __      USPS             APPLICANT TRACKING
              __      USPS             BENEFITS ADMIN
              __      USPS             FYE PROCESSING
              __      USPS             LEAVE ACCOUNTING
              __      USPS             NAME SEARCH
              __      USPS             PAYROLL ADMIN
              __      USPS             PERSONNEL MANAGEMENT
              __      USPS             POSITION CONTROL
              __      USPS             REPORTS
              __      USPS             SYSTEM SUPPORT TOOLS
              __      USPS             USPS MESSAGES
              __      USPS             USPS SECURITY

A205W-END OF LIST
                                          06/21/02  12:14:42 1 M3LL PARJ ____
How to Navigate
Use the following procedure to navigate through USPS.
| Step | Action |
|---|---|
| 1 | Enter XX in the field to the left of the module you wish to access in USPS. |
| 2 | Press Enter. The USPS system submenu (CMOXX) system submenu screen appears for the module chosen. |
| 3 | Enter the number of the screen you want to select in the SELECT OPTION NUMBER field and the appropriate key information in the COMMAND QUALIFIER field. |
| 4 | Press Enter to go to the selected screen. |
> C     USPS,LEAVE ACCOUNTING                                         ON CMOXX
                                                        LEVEL 01 LINK FROM CMONU
                    UNIFORM STATEWIDE PAYROLL/PERSONNEL SYSTEM
      TASK ID--> USPS        LEAVE ACCOUNTING                  PATTERN-> __
         -----------DESCRIPTION---------- -------CMD QUALIFIER CONTENT ----
      1. LEAVE DATA DISPLAYS
      2. LEAVE REQUEST ACTIVITY   (HM9U1)  AGENCY, SSN
      3. LUMP SUM SPECIAL PAYMENTS(HUZU1)  AGENCY, BATCH NO, PAGE NO
      4. EMPLOYEE LEAVE ACCRUALS  (HMCU1)  AGENCY, SSN, FISCAL YEAR
      5. FMLA AUTHORIZATION       (HO8U1)  AGENCY, SSN, FMLA EVENT
      6. SICK LEAVE POOL
      7. LEAVE ACCOUNTING TABLE MAINT
      8. STANDARD REPORTS         (HSRPT)  AGENCY
      9. REPORT REQSTS AND FLAGS  (HNKLA)  AGENCY
      10. LEAVE SUMMARY MESSAGES  (HNKLM)  AGENCY


     SELECT OPTION NUMBER--> ___
     COMMAND QUALIFIER ----> *
 A205W-END OF LIST
                                         10/23/02  12:08:26 1 M3LL TARN ____
USPS Command Line Navigation
Introduction
The Command Line appears at the top of every USPS screen. It enables you to move throughout USPS quickly and easily.
Example
The following is an example of a USPS screen. The Command Line consists of three parts, which are labeled on the example. The three parts are:
| 1 | COMMAND field. |
|---|---|
| 2 | COMMAND QUALIFIER field. |
| 3 | SCREEN NAME field. |
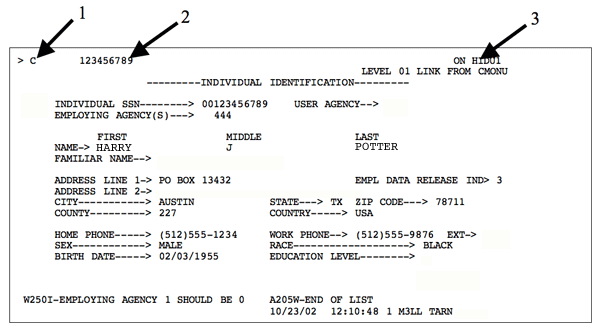
Command Field
You will enter commands in the COMMAND field to tell the system what you want to do. The following table shows valid entries for the COMMAND field.
| Entry | Function |
|---|---|
| GD (Get for Display) | This command retrieves screens for display only. You cannot update records on display screens. If there are multiple records for a given key, press Enter to scroll through the records. A red C appears in the COMMAND field when you reach the last record. |
| C (Red) | The system automatically displays a red C in the COMMAND field when you process a GD command. This tells the system to cancel the command and return to the previous screen or menu. |
| C (Cancel) | This command cancels the current command or the lowest link level and returns you to the previous screen. |
| CC (Cancel Two Link Levels) | This command cancels the last two link levels. |
| Q (Quit) | This command cancels all link levels and returns you to a blank Command Line. |
Command Qualifier Field
Use this field to indicate which employee and/or agency will be affected by the action you perform. This information tells the system which records to access.
Note: Enter information in this field separated with commas but without spaces. For example:
> GU    123,123456789                                                 ON H0BUD
                       -----EMPLOYEE TAX INFORMATION-----

    AGENCY-->  00123   EMPLOYEE SSN-->    123456789           ORG-> 09990000000
    NAME> POTTER, HARRY
    --------------------------FEDERAL INCOME TAX-------------------------------
         STATUS          FILE STATUS          STEP 2 BOX        NO EXEMPTS
 ____      4                  1                   _                01
       DEP CREDIT        OTHER INCOME         DEDUCTIONS       EXTRA AMOUNT
         00000             0000000             0000000            00000

    ----------------ADDITIONAL TAX STATUSES AND INDICATORS---------------------
    FICA    FUTA    SUI    SUI ST    RES ST    RES LOC      BRP       TAX UNIT
     4       1       1       44        44        00       W              01
    FICA CHG DATE--> 00/00/0000   WAGE PLAN CODE--> S    PQ WAGE PLAN CODE--> S
    FIT LOCK--> MS   EXMPTS 00

    ------------------------STATE AND LOCAL TAXING-----------------------------
    WORK STATE----->   44      WORK LOCAL----->   00     TAX %----------> .999
    -----------------------SPECIAL PAY TAX PERCENTS----------------------------
    FIT TAX %------> .000      SIT TAX %------> .000     LOC TAX %------> .000

                                         12/12/19  16:13:52 1 M3LL PARJ ____
You may use the arrow keys to move freely about any USPS screen. When you press Home, your cursor returns to the COMMAND field.
Accessing the Main Menu from the Command Line
You can access the main menu from the Command Line by performing the following steps:
| Step | Action |
|---|---|
| 1 | From any screen, enter GG in the COMMAND field of the Command Line. |
| 2 | Enter USPS in the COMMAND QUALIFIER field of the Command Line. |
| 3 | Enter CMONU in the SCREEN NAME field of the Command Line. |
The Command Line will look like this:
> GG__ USPS_________________________________________ ON CMONU
Note: You may access the opening menu from any area of the system by pressing the F3 key until you cancel all links and a blank Command Line appears.
Screen Name Field
The SCREEN NAME field is a five-digit field. The first three characters identify the database (DBID) and the last two characters identify the screen (Screen ID). This field tells the system where to perform the action.
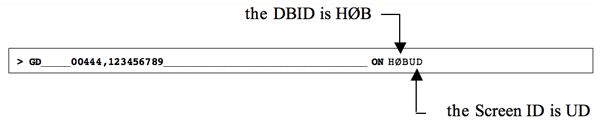
The database identifier (DBID) tells the system which file contains the data you need. Most USPS databases begin with the letter H, which represents human resource files. Each database also has unique key information fields. For example, enter the EMPLOYEE SSN key to access all screens in the HID database.
Screen identifiers determine the data that is displayed on the screen.
Note: If a screen name ends in LS (screen ID) it is a list screen. For example, HNPLS and H0BLS.
How USPS Stores Data
USPS stores data using files, records and fields.
| File | A collection of records. Records are collected in a database. Each database is assigned a unique three-character identifier. This identifier tells the system which file to access to get the data you need. |
|---|---|
| Record | A related group of information, which is one row in the database (for example, an employee's last name, first name and address). |
| Field | A single unit of data. An employee’s last name is an example of a unit of data. |
Single and Multi-Record Screens
Screens enable you to view the data found on USPS databases. USPS has two types of screens: single-record screens and multi-record screens.
Single-Record Screens
Single-record screens display one record at a time and have only one SUBCOMMAND field.
> GD    00444,123456789,01011730                                       ON HMPHR
                                                        LEVEL 01 LINK FROM CMONU
         ------------------ EMPLOYEE ASSIGNMENT CHANGE ------------------
 __   AGENCY> 00444   EMP SSN> 123456789      POS> 01011730     JOB NBR-> 1
 NAME> POTTER, HARRY J                               STATUS---> INACT:PMT PEND
                                                       PREV POS--> ________
 ASSIGN DT> 03/01/2001   PAY CHG DT-> 00/00/0000   NON PAY CHG DT> 00/00/0000
 REASON CD/EXT> 010 ____ NEWLY HIRED OR REHIRED EMPLOYEE

 ORG CODE-----> 00000100100 / ADMINISTRATION OFFICE
 PCA/PCNT> P13409 / 100.0 LOC/EXT> 00001 / _____   AGENCY DEFINED 1---> ________

 JOB  CLS/TITLE-> 8032 / GROUNDSKEEPER II                         CARD>
 FUNC CLS/TITLE-> ____ /
 TB-GRP/STP> 1A-05 / 07  SAL>    810.50 RATE>     .00000  HRS/FTE> 40.00 / 1.000

 EMP TYP> CRF PAY FREQ/TYPE> S / SALARY     FLSA ELIG/EEO CAT> NON-EXEMPT    / M
 HAZ DTY IND> N                             START DAY OF WEEK> MONDAY
 INACTIVE DT> 08/31/2001  MSR---> N         ELEC SERV MOS---->    0

 CREATE POS> S PREV POS INACTIVE DT> 00/00/0000       CREATE/UPDATE HNP--> U
 POS TYP> _              EEO-4> 10 BUD UNIT> ___________    SPVR POS> ________

                                         10/23/02  12:11:41 1 M3LL TARN ____
Multi-Record Screens
Multi-record screens display a series of records on one screen. Each record contains a separate and independent subcommand. When viewing multi-record screens, the system displays the:
- Keys to the last record on the screen within the Command Line qualifier.
- Range of records when using a partial key after you press Enter.
In the example below, two records are highlighted. Note that each record has its own SUBCOMMAND field.
                  -------------------PAY TABLE-------------------

       AGENCY--> 00000        TABLE TYPE--> 01


       PAY    PAY    EFFECTIVE    HOURLY     MONTHLY        ANNUAL    INACTIVE
       GROUP  STEP        DATE      RATE      SALARY        SALARY        DATE

 ____  02     00    09/01/1993      5.59      969.00     11,628.00  00/00/0000
 ____  02     01    09/01/1993      5.75      998.00     11,976.00  00/00/0000
 ____  02     01    12/01/1992      5.75      998.00     11,976.00  08/31/1993
 ____  02     01    09/01/1992      5.59      969.00     11,628.00  11/30/1992
 ____  02     02    09/01/1993      5.93    1,028.00     12,336.00  00/00/0000
 ____  02     02    12/01/1992      5.93    1,028.00     12,336.00  08/31/1993
 ____  02     02    09/01/1992      5.75      998.00     11,976.00  11/30/1992
 ____  02     03    09/01/1993      6.10    1,059.00     12,708.00  00/00/0000
 ____  02     03    12/01/1992      6.10    1,059.00     12,708.00  08/31/1993
 ____  02     03    09/01/1992      5.93    1,028.00     12,336.00  11/30/1992
 ____  02     04    09/01/1993      6.29    1,091.00     13,092.00  00/00/0000
 ____  02     04    12/01/1992      6.29    1,091.00     13,092.00  08/31/1993
 0007I-BROWSE BACK NOT ALLOWED ON H7SLS
                                         12/19/94  16:34:56   M3LL ACTION ____