
Reporting Requirements for Annual Financial Reports of State Agencies and Universities
Notes & Samples
Instructions for the ONDSS Web Application
The Other Notes and Disclosures Submission System (ONDSS) web application provides a user-friendly and intuitive method to electronically submit note disclosures. ONDSS ensures uniformity of these disclosures for the ACFR Notes.
Agencies can save work-in-progress in ONDSS at any time and later recall their disclosure to edit or delete. Reports are available in HTML format and include an option to download the previously uploaded attachment. ONDSS produces a statewide database used for ACFR reports and disclosures. All agencies with activity for these notes are required to use ONDSS to input and certify disclosures.
Do NOT submit a note to indicate “not applicable.” If the note is not applicable to the agency, select the This agency does not have (note description) checkbox and click Save.
Agencies can remove and replace a previously uploaded file in ONDSS prior to certification.
Or click on the headings below to open a topic individually.
Deadlines for Entry [+]
The ODNSS certification is due annually by:
- Oct. 1, 20CY (for GR consolidated agencies)
- Nov. 1, 20CY (for full reporting agencies)
- Nov. 20, 20CY (for institutions of higher education)
Establish Security Access [+]
Ensure proper security access exists as early in the process as possible. Contact your agency’s security coordinator to request ONDSS access for each agency number you are reporting.
Note: When requesting access from your security coordinator, ensure that you communicate the four-character Security Coordinator’s USAS Reference Code specific to this web application.
General Features of ONDSS [+]
System Records
Individual records are saved in ONDSS based on the agency.
Agency Number
You may access a different agency number if you have established security for that agency. Select your agency from the drop-down menu and click Go.
Screen Formats
Agency input boxes are the only fields available for entry.
Screen Navigation
Click Save to save the disclosure with the data entered up to that point.
Save Feature
Click Save and the status box displays the message Saving data. Once a disclosure is saved, click the Edit/Delete action tab to make any changes to the existing disclosure.
Disclosure Screens
The disclosure screen includes a note disclosure section for entry of the other note descriptions.
Log Into ONDSS [+]
Once proper security authorization is established, you can access ONDSS.
- Enter your
USER ID.
Your User ID is the same as your ACID used to access the Comptroller’s mainframe and USAS. - Enter your
PASSWORD.
This is your USAS password. - Click Submit to enter ONDSS.
If your ONDSS security access is denied and an error message displays, contact your agency’s security coordinator.
ONDSS loads the data for other notes and disclosures and a status bar appears below the login information indicating that the system is processing. After processing is complete, ONDSS returns to the Home screen.
Selecting an Agency and Choosing Note Disclosures [+]
The agency name(s) and number(s) are automatically retrieved from the security access permissible by your User ID. If you have access to multiple agencies, a drop-down menu displays a list of agencies for which you have access.
- Select the agency from the drop-down menu.
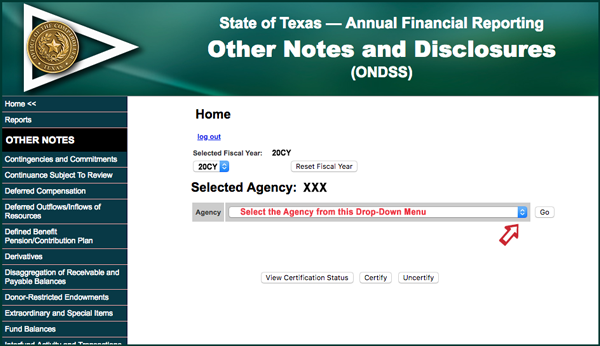
- Click Go.
The screen refreshes and displays the selected agency. - Click an applicable Note under Other Notes or Other Disclosures banner in the left navigation menu to begin entering disclosure information.
Adding, Editing or Deleting Other Notes or Disclosures [+]
- Choose an applicable Note under Other Notes or Other Disclosures banner in the left navigation menu.
The disclosure screen has two actions:
Add and Edit/Delete. This screen automatically defaults to the Add action tab.
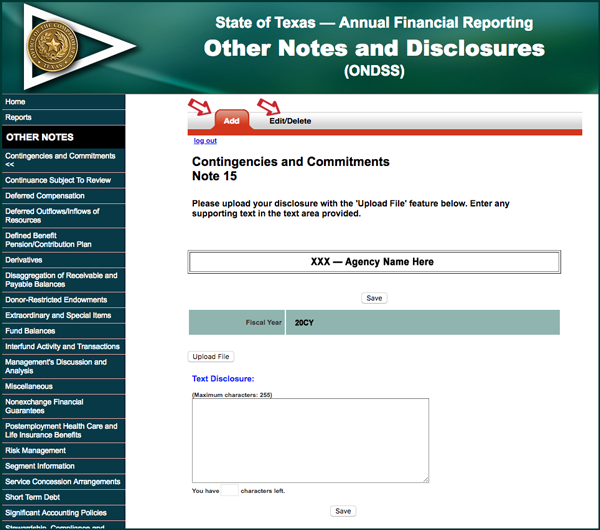
Adding a Disclosure
- Select the disclosure in the left navigation menu to add.
- Press Tab to navigate to the data entry field.
- Enter the applicable data.
- Click Upload File to upload the necessary file.
- Click Choose File to open a finder window that allows you to select the Microsoft Excel file you want to upload.

- Click Continue.
Note: Only ONE Word or Excel file can be uploaded for each Note or disclosure. Ensure that all pertinent information is included in your single Word/Excel file. You may create multiple tabs, if necessary.
After uploading the file, ONDSS returns to the main disclosure screen.
- Click Save at the bottom of the disclosure screen.
The screen automatically refreshes and moves the saved data to the Edit/Delete action tab.
Editing a Disclosure
If the agency is listed, a disclosure was previously saved to the system — only an edit/delete to this disclosure is allowed.
- Select applicable Note under Other Notes or Other Disclosures banner in the left navigation menu to edit.
- Click the Edit/Delete action tab.
ODNSS displays the data as currently saved. - Press Tab to navigate to the data entry field.
- Edit the data.
- Click Save.
ONDSS returns to the edit screen. - Click Log Out to exit ONDSS.
Deleting a Disclosure
- Select applicable Note under Other Notes or Other Disclosures in the left navigation menu to edit.
- Click the Edit/Delete action tab to access the disclosure.
ONDSS displays the data as currently saved. - Click Delete.
ONDSS returns to the edit/delete screen. - Click Log Out to exit ONDSS.
Agencies can remove and replace a previously uploaded file in ODNSS prior to certification.
- Select Remove File.
- Select Remove File again (required).
- Select Browse to route to the new file to upload.
- Choose the new file to upload and click Continue.
- The message SAVE required for Uploaded/Removed file displays.
- Click Save to complete the upload.
Fluctuation Analysis [+]
All full reporting agencies and institutions of higher education must submit a full fluctuation analysis. There are five mandatory parts to this analysis:
- Balance Sheet Fluctuation Analysis (CR129a)
- Changes in Net Assets by GAAP Fund (CR131a)
- Operating Statement Fluctuation by GAAP Fund (CR130a)
- Operating Statement Fluctuation by GAAP Fund – Basis Conversion (CR132a)
- Proprietary Operating Statement Fluctuation Analysis (CR133a)
To make this easier, an FRA Fluctuation Analysis (Excel) spreadsheet is available in the Annual Financial Report Working Papers section.
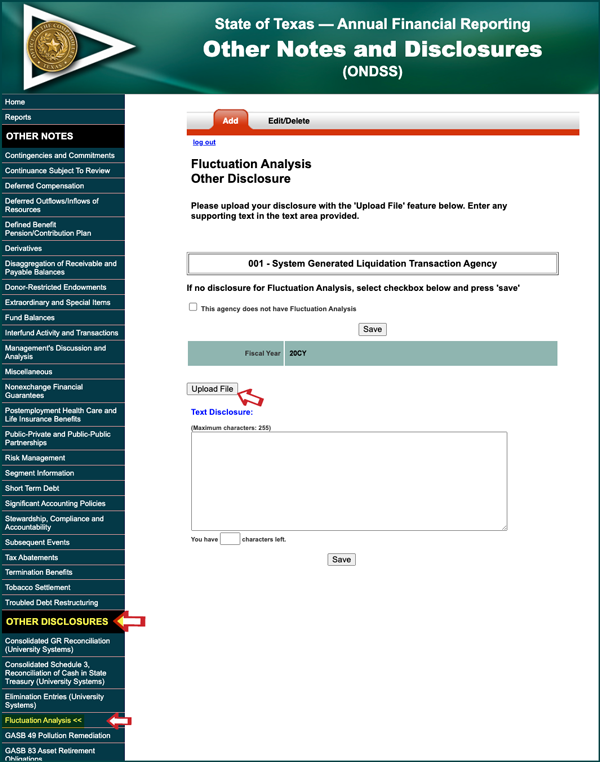
When completed, locate the Other Disclosures banner in the ONDSS left navigation menu and select the Fluctuation Analysis left menu item, then click Upload File to upload the FRA Fluctuation Analysis (Excel) spreadsheet.
Post-period Subsequent Events [+]
The Post-period Subsequent Events box in ONDSS is only available for agency submissions annually from Jan. 1 through Jan. 14.
If your agency has a Post-period Subsequent Events that occurred after Jan. 14, contact your financial reporting analyst for assistance.
Agencies must submit the agency’s post-period subsequent events (or indicate no further disclosure is applicable) through the ONDSS web application by clicking the Upload Post-period Subsequent Events link within the Post-period Subsequent Events box.
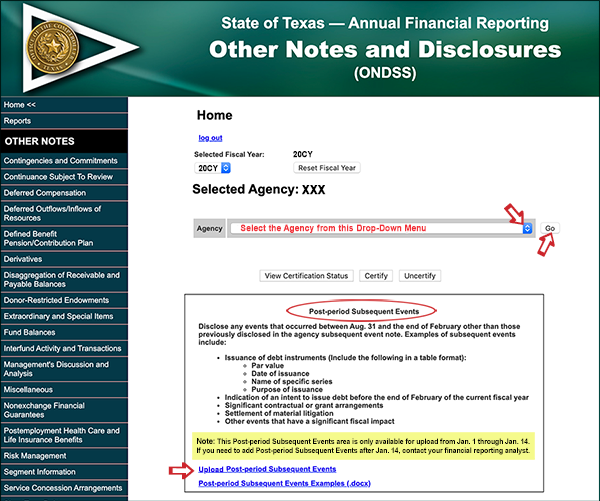
On the next screen, each agency is required to either:
- Click the checkbox next to The agency does not have Post-period Subsequent Events indicating that no further disclosure is applicable and click Save.
–OR– - Click the Upload File button to submit a copy of the agency’s post-period subsequent events and click Save.
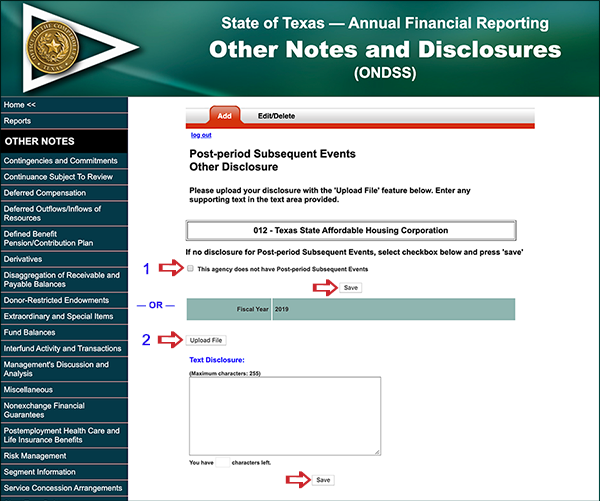
The required format is a Microsoft Word document (latest version: docx) with header information that includes: agency name/number and note number/name. If the note contains a table, include the table in the Word document — rather than as a separate Excel document or other database application file.
Reports [+]
After transaction activity and disclosure information is entered in ONDSS, users can generate a report (in HTML format) that documents all comments and file attachments submitted through ONDSS.
ODNSS reports are the agency’s official submission of other notes or other disclosures information for the ACFR process. Viewing reports (HTML format) is an option available on disclosure screens and may be selected at any time. You may only view reports for any agency for which you have established security.
To view a report:
- Click Reports in the left-hand navigation menu.
- Select the agency from the drop-down menu.
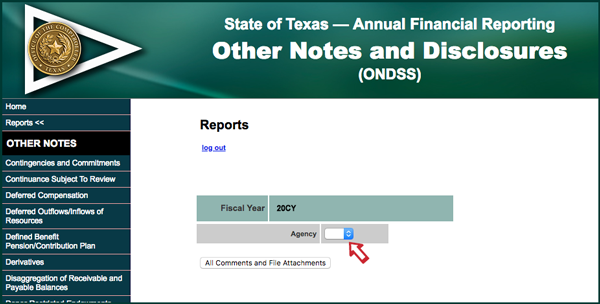
- Click All comments and File Attachments to generate a report.
Certification [+]
From the Home screen:
- Select the Agency from the drop-down menu.
- Click Go.
- Click either:
- View Certification Status
Displays the agency’s certification status.
–OR– - Certify
You are confirming that all disclosures are complete. Once certified, all disclosures are locked — however, you may still run reports.
- View Certification Status
If an adjustment is necessary after certification, please contact your financial reporting analyst.
Note: Screen prints from ONDSS will not be accepted in lieu of the required copy of the agency’s Notes from its published AFR.
ONDSS for Consolidated University Systems [+]
Each consolidated university system (agency numbers 792, 793, 794, 795, 797, 798 and 799) must enter the information for all of its component universities in summary as described above.
IMPORTANT: Components of university systems must not use ONDSS.