
Payment Search
Search State Payments Issued (SSPI)
The Comptroller’s office maintains the SSPI web application, which is accessed via the eSystems login page. The application allows state payees and state employees to search for payment information and remittance details based on the information the paying agency submits to the statewide accounting systems. Payment search displays only those payments issued through the Comptroller’s office; payments issued from a state agency’s local funds are not included and cannot be searched on this application.
Both warrants and direct deposit payment types may be searched as follows:
- State Payees – Search payments issued by any state agency via the Comptroller’s office.
- State Employees – Search travel reimbursement payments only. This web application does not display payroll payments or earnings statements. Employees should contact their agencies’ payroll or human resource officers for questions about payroll payments and requests for earnings statements.
SSPI also provides an Advanced Payment Notification (APN) feature that generates an email alert when a payment is issued. Email alerts are sent for warrants and/or direct deposit payments.
Instructions for SSPI
Follow these instructions to:
Set Up SSPI TINs
Follow these steps if you just created an eSystems profile to set up access to your Texas Identification Number (TIN).
- Log in to eSystems.
- From the eSystems dashboard, click Search State Payments Issued below the heading I want to…

- The Search State Payments Issued page displays with the following steps:
- 01 Set Up Account Access.
- 02 Confirm Access Rights.
- 03 Terms of Use.
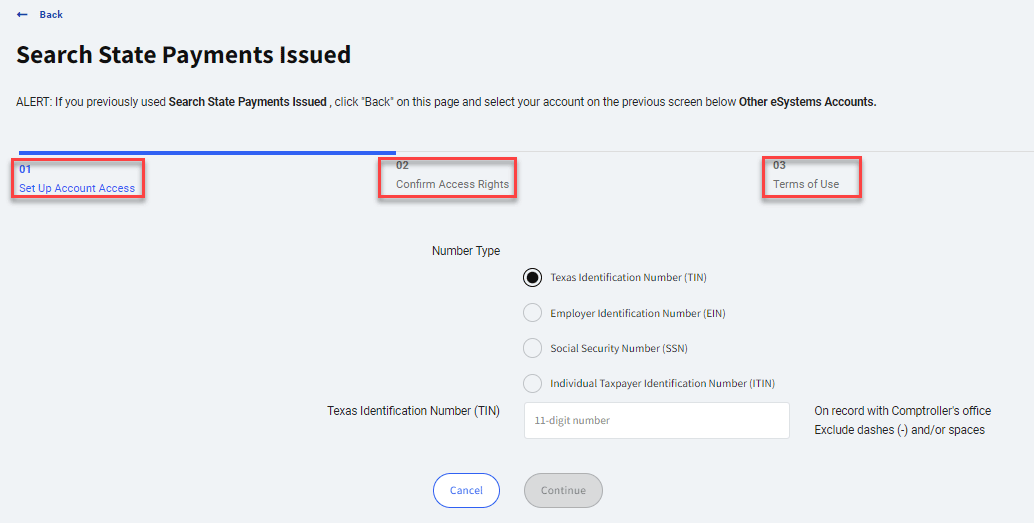
- From the 01 Set Up Account Access screen, complete the following fields:
Number Type: Select a radio button (only one) for one of the following:- Texas Identification Number (TIN): Must be 11 digits.
- Employer identification number (EIN): Must be 9 digits.
- Social Security Number (SSN): Must be 9 digits.
- Individual Taxpayer Identification Number (ITIN): Must be 9 digits.
Number: Enter the 11- or 9-digit number for theNumber Typeselected. The number entered must be on record with the Comptroller’s office as having received state payments.- Click Continue to display the 02 Confirm Access Rights screen.
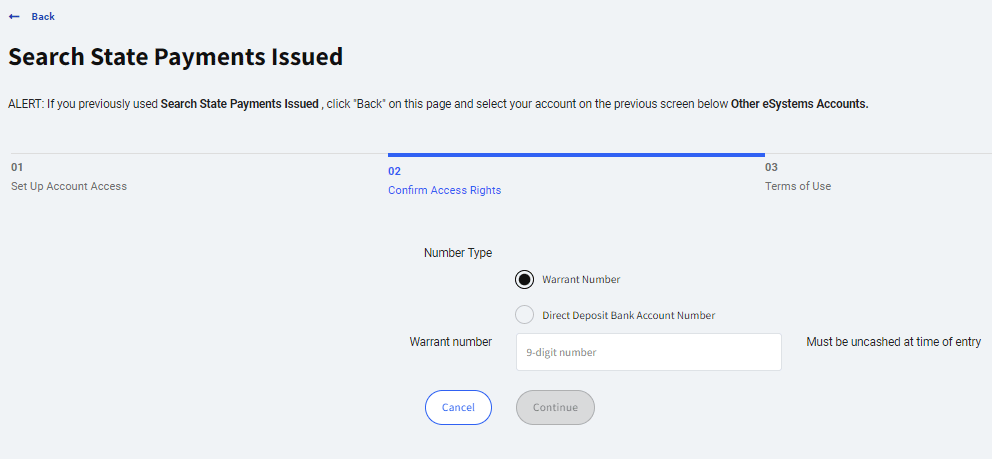
- From the 02 Confirm Access Rights screen, complete the following fields:
Number Type: Select a radio button (only one) for one of the following:- Warrant Number: Must be 9 digits and must be uncashed at the time of entry.
- Direct Deposit Bank Account Number: Must be on record with the Comptroller’s office. Exclude dashes (-) and/or spaces.
Number: Enter the 9-digit warrant number or direct deposit account number for theNumber Typeselected.- Click Continue to display the 03 Terms of Use screen with the title Disclaimer.
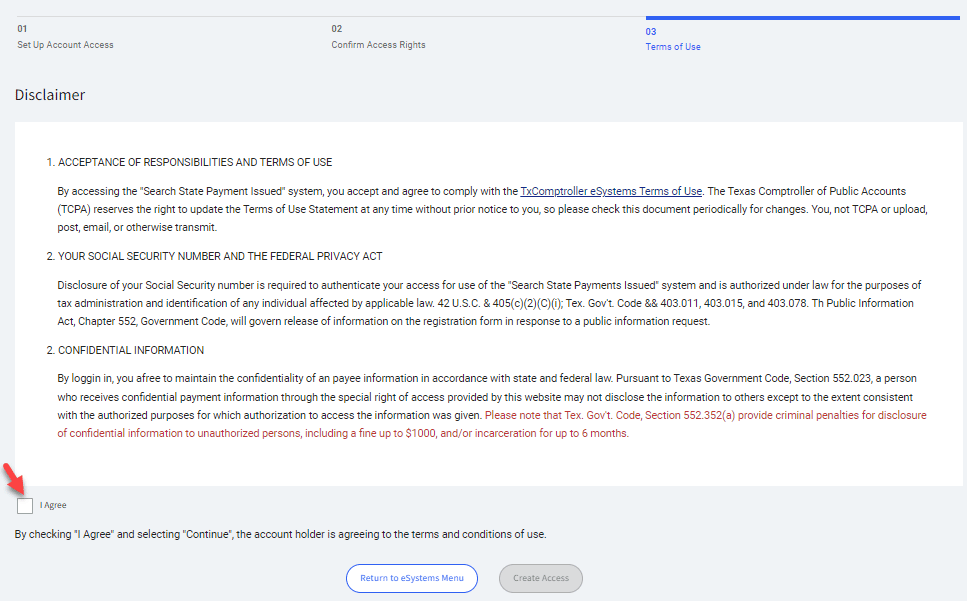
- From the 03 Terms of Use screen:
- Click the check box next to
I Agree. - Click Create Access. The eSystems dashboard displays.
- Click the check box next to
- The TIN setup process is now complete.
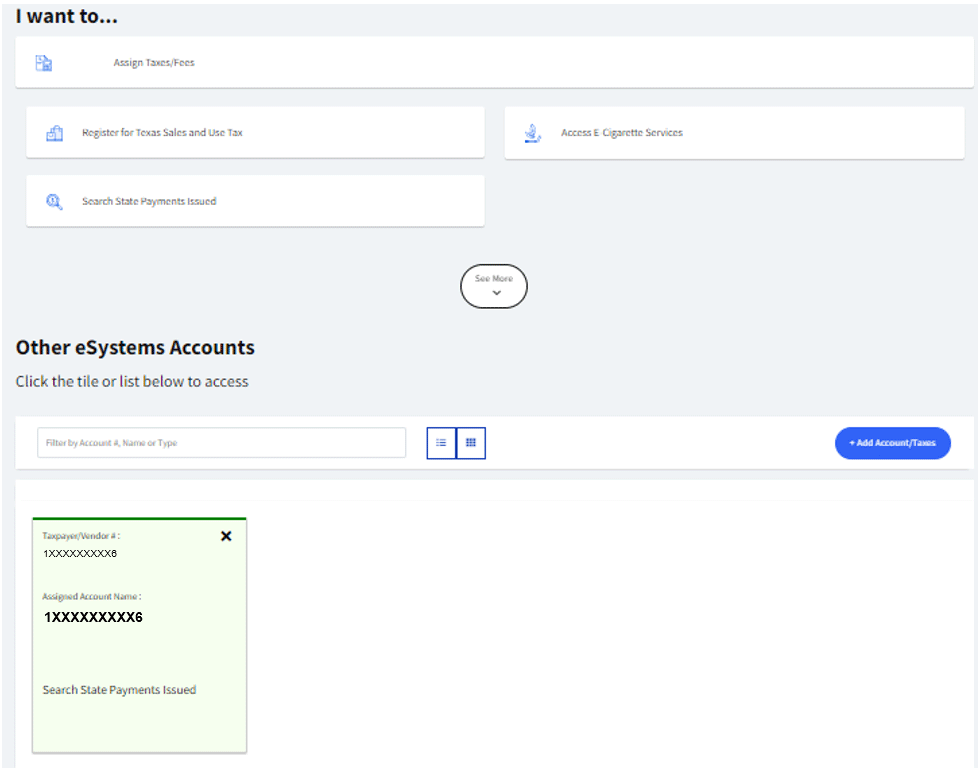
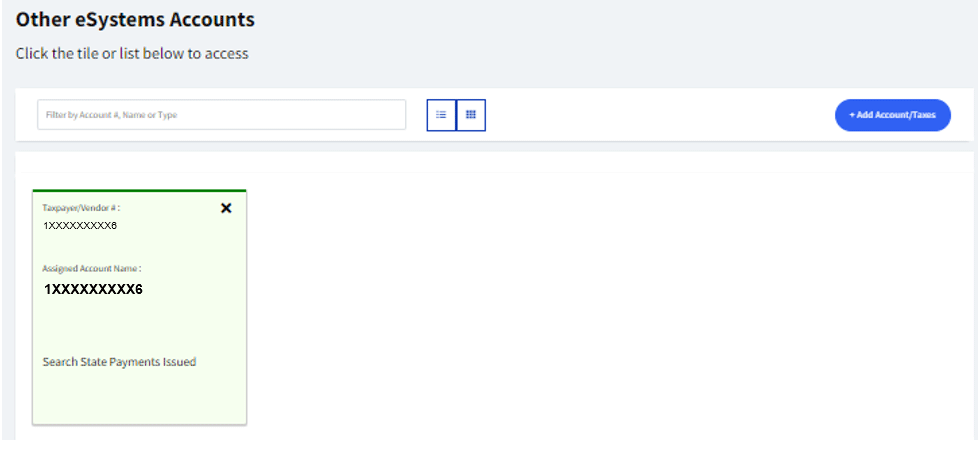
- From the eSystems dashboard below the heading Other eSystems accounts, a green tile titled Taxpayer/Vendor #: displays with the TIN for which you created access.
- Click inside the Taxpayer/Vendor #: tile to access SSPI.
- For instructions on how to search payments on SSPI, see Perform an SSPI Payment Search.

Perform an SSPI Payment Search
Follow these steps if you just created an eSystems profile and completed the steps to set up an SSPI TIN, or you are a return user of SSPI.
- Log in to eSystems.
- Enter your User ID and Password.
- Click LOG IN to display the dashboard with the headings:
- I want to…
- Other eSystems Accounts
- Do not click the Search State Payments Issued box below the heading I want to…
- Clicking this box will direct you to the SSPI Step 01 Setup Account Access screen which you have already completed with an uncashed warrant number or your direct deposit account number. An Alert message displays below the screen title, as in this example.
However, if you need to set up SSPI access for another TIN, click the Search State Payments Issued box to navigate through the Set Up SSPI TINs steps.

- Click Back in the upper left corner to return to the eSystems dashboard.
- Clicking this box will direct you to the SSPI Step 01 Setup Account Access screen which you have already completed with an uncashed warrant number or your direct deposit account number. An Alert message displays below the screen title, as in this example.
- From the dashboard below the heading Other eSystems Accounts, click inside the tile (green or white box) titled Taxpayer/Vendor #, which displays the Texas Identification Number (TIN) for which you created access.
- Multiple tiles may display if a vendor (business entity) sets up access to multiple TINs that receive state payments.
- Multiple tiles may display if a vendor (business entity) sets up access to multiple TINs that receive state payments.
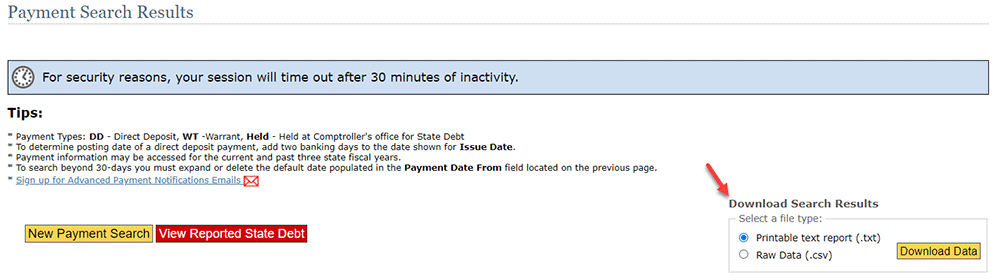
- The SSPI Payment Search screen displays.
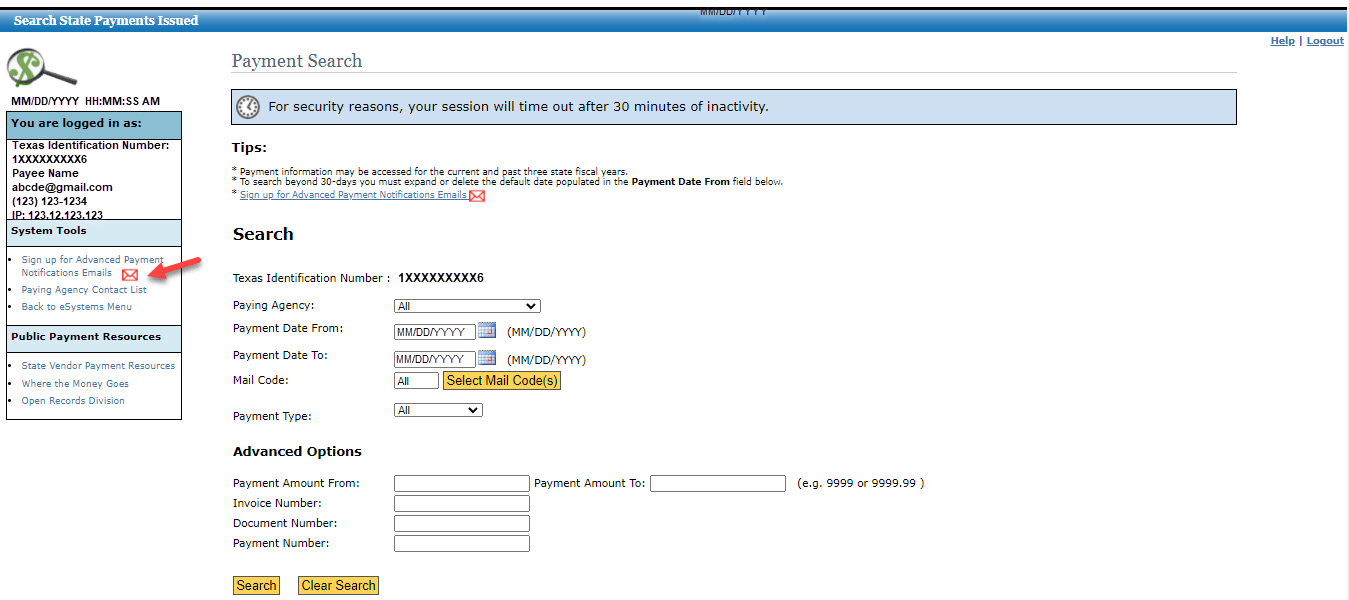
- The Advanced Payment Notification (APN) link and envelope icon are displayed in the Systems Tools box on the left. Click on the link or the envelope icon to set up APN. See Set up APN for instructions and screen samples.
- Select from the fields displayed on the Payment Search screen to perform a search.
Paying Agency
If you receive payments from… Then… Only one agency The field defaults to that agency. Multiple agencies - The field defaults to the lowest agency number, followed by the agency name.
- Click the down arrow in this field to display the list of agencies.
- Select an agency from the list. Only one agency may be selected per search.
Payment Date From:Defaults to 30 days from current date. To change the default, enter a date in the MM/DD/YYYY format or click the calendar icon to select a date.Payment Date To:Defaults to current date. To change the default, enter a date in the MM/DD/YYYY format or click the calendar icon to select a date.Mail Code:Defaults to All. If you receive payments on multiple mail codes, click Select Mail Code(s) to display the Mail Code List screen.

- The
Sort Byfield defaults to Mail Code and includes a dropdown to select from the following sort options. If you change the default, click Sort.- Name A-Z.
- Name Z-A.
- City A-Z.
- City Z-A.
- State A-Z.
- State Z-A.
- Zip 0-9.
- Zip 9-0.
- Click the check box(es) for one or multiple mail codes in the list, then click Continue to return to the Payment Search screen. The
Mail Codefield displays as follows:- The selected mail code if only one mail code is selected.
- The word Multi if multiple mail codes are selected.
- The
Payment Type: Defaults to All. Click the down arrow in this field to change to:- Direct Deposit – Displays only direct deposit payments.
- Warrant – Displays only warrants, including held warrants.
- Held – Displays only held warrants.
If… Then… No payments are on file for the selected Payment Type- The application displays the message No records found. Please revise the search criteria.
- Click New Payment Search to return to the Payment Search screen.
The warrant was issued as a held warrant
The Held status remains static in this application, even after the warrant is no longer on hold at the time a search is performed.
Payment Amount From:
Payment Amount To:
Enter amounts in the 9999 or 9999.99 format (without commas). Examples:
- For $10,150.00, enter 10150 or 10150.00.
- For $123.29, enter 123.29
Invoice Number:The value entered must match an invoice number the paying agency submitted to the accounting system.Document Number:The value entered must match the value assigned by the paying agency; limited to eight characters.Payment Number:Enter a 9-digit warrant number or a 7-digit direct deposit payment number.
- Click Clear Search to clear all field entries and re-enter new fields.
- Click Search to display the Payment Search Results screen.
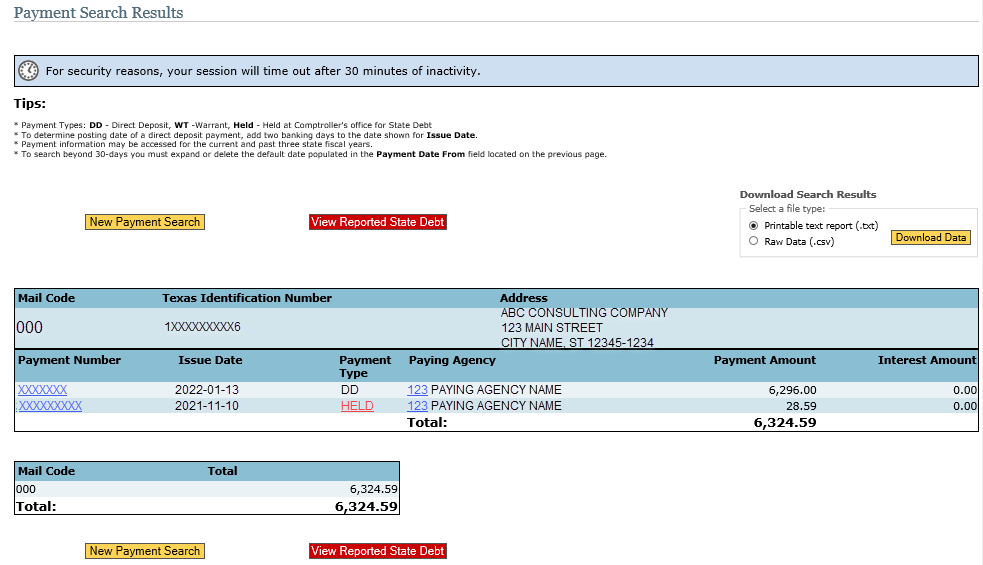
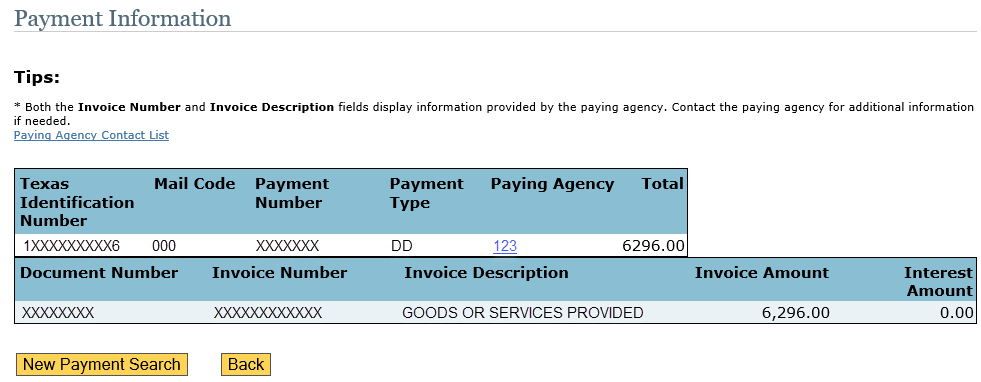
- Click on a Payment Number to display the Payment Information screen. To return to the Payment Search Results screen, click Back.
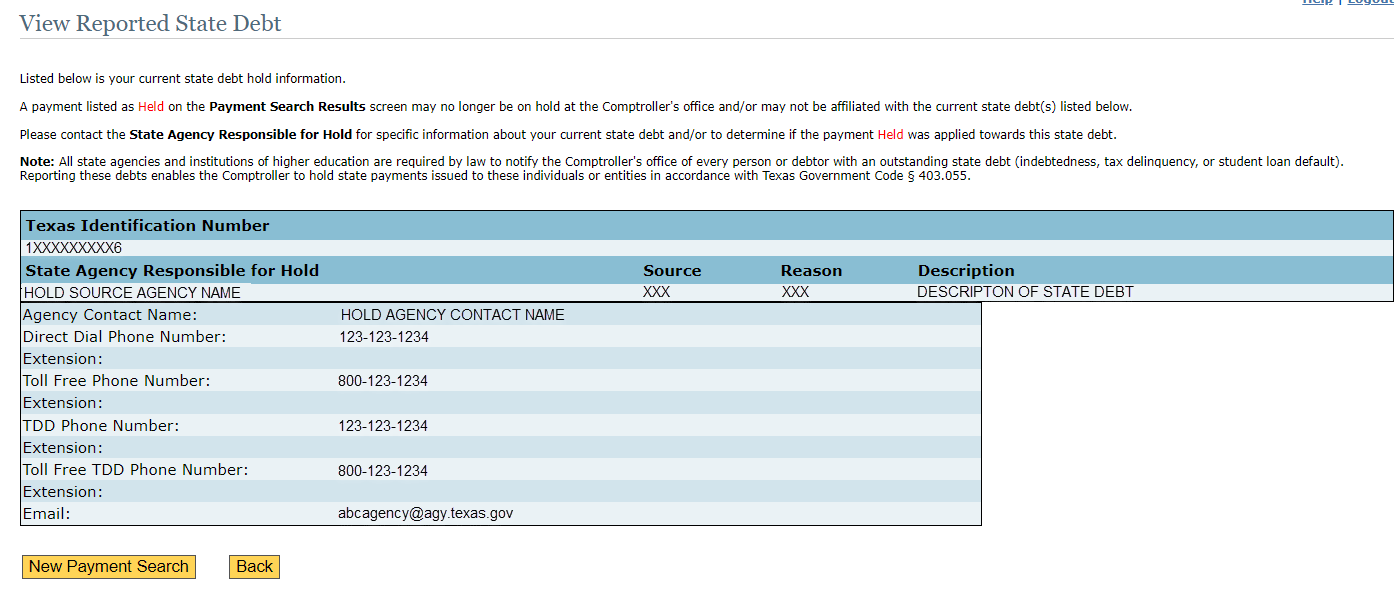
- Click Held under Payment Type or View Reported State Debt to display the View Reported State Debt screen with the hold reason description and hold source agency contact information. To return to the Payment Search Results screen, click Back.
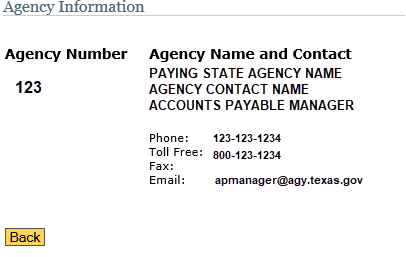
- Click the Paying Agency number to display the Agency Information screen. Contact that agency with any questions regarding the payment. To return to the Payment Search Results screen, click Back.
- Click on a Payment Number to display the Payment Information screen. To return to the Payment Search Results screen, click Back.
Download Search Results
Select a file type by clicking one of the radio buttons in the upper right corner of the Payment Search Results screen for one of the following formats then click Download Data.
- Printable text report (.txt) – Default.
- Comma-separated values (CSV) or raw data file.
- Printable Text Report (Sample)

- CSV Report
The results are downloaded into an Excel spreadsheet with the following column headings (columns A – V, which can be adjusted as needed):
- Texas Identification Number
- Mail Code.
- Payee Name.
- Address Line 1.
- Address Line 2.
- Address Line 3.
- Address Line 4.
- City.
- State.
- Zip Code.
- Payment Issue Date.
- Payment Number.
- Payment Type.
- Consolidated Payment Amount.
- Consolidated Interest Amount.
- Invoice Amount.
- Invoice Interest Amount.
- Invoice Number.
- Invoice Description.
- Document Number.
- Paying Agency ID Number.
- Paying Agency Name.
Logout
Click Logout in the upper right corner of each screen or sub-screen.